Thursday, September 26, 2013

Pink Surprise


It's pink! Pink accent paint! And it looks really bright and scary in the can!

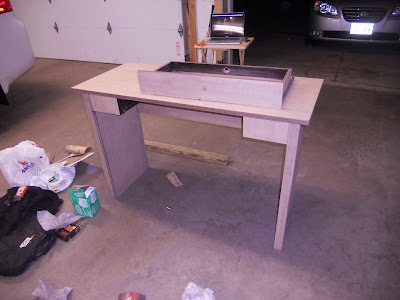
I actually love the color as is. However, when I put the gray paint on I wasn't 100% decided on where the pink would go, so I decided to paint the whole thing gray and then layer pink selectively on top. That way, everything ends up the same pink, instead of a muted pink-over-gray right next to a bright just-pink-and-primer.


I applied some blue painter's tape to keep my edges clean, and got started.


I believe this was taken in between coats.

Come back tomorrow for the finished project!


Wednesday, September 25, 2013

7 Days

We're moving in 7 days. 7 days. It's snuck up on me.

We made an epic trip to Ikea over the weekend, buying a bed, a desk, a shelf, couch, and a tv stand; all to be delivered our first Saturday in the new place.

Excuse the cruddy iPhone shot from the Ikea check out line. In line, my husband is dancing to the music. Meanwhile, I'm collapsed on top of our cart–brain overload!

We're moving on Wednesday, so we'll be "camping" for a few days, I guess. It'll be fun, right? Right?

I haven't made much progress on the packing front, since so much of my free time has been devoted to the desk, so I re-balanced that equation tonight. Nothing new on the desk front, but half of my kitchen is packed!

Tuesday, September 24, 2013

2nd coat-check!

For the second coat, I switched to a foam brush. Roughly 10,000 times easier (roughly), no brush strokes, and it went down in about 45 minutes instead of 2.5 hours.


The above pic, taken after coat 1, shows off the brush strokes better.


This is after coat 2--much better!


On deck for tomorrow: Accent color!

Monday, September 23, 2013

1st coat-check!

I started with a typical art-class paint brush and cut it around the hardware. 


This is the the only picture I took while painting, or rather, while pretending to paint. I'm not sufficiently talented to actually paint within the lines with my right hand while simultaneously taking an in-focus picture with my left hand. If you look closely, you'll notice the brush is hovering just above the surface. That's the way I roll? 

And boom, the first coat is done!


I used a nylon brush paintbrush, and struggled against brush marks the entire time. It was a losing battle, though it's hard to tell from the pictures. 

I tried to do long brush strokes, but I couldn't get the right amount of paint on the brush. It would either be way too little and it would only cover about 6 inches; or it would be to much and it would go all over the place, but only in the immediate vicinity of that first touch and no where else. I did the best I could, and changed strategy for the second coat. More on that tomorrow!

Thursday, September 19, 2013

Too humid to paint

The internet said it was too humid to paint today, so I didn't. It was hard to pinpoint how humid is too humid, but some consensus emerged at 70-80%. 

It's been warm with scattered showers today, by the time I got home from work the humidity was 79% and climbing.

Other than some light sanding, the desk was untouched today. I do have this glamorous shot from yesterday, though.

Primed and Ready!

Today's mission was priming, two coats, please. Except I stupidly only bought one can of primer. Because you can totally get two-three coats out of one can, right? WRONG!


This is how far one can got me. Roughly halfway through the actual desk, not a drop on the door. Emergency trip to the hardware store! Because really, what DIY project would be complete without one?

Picked up three more cans, finished the first coat and let it dry for an hour:


 Then I put on the second coat and called it a night:


Remember how I didn't sand the inside panels of the drawer? After the second coat, you can't tell. At least not yet. We'll see how it looks once it's completely dry, I might skip sanding next time.

Next steps: light sanding to even out any heavier spots, and the first coat of actual paint. Not sure how long it will take the paint to dry, so I'm only planning to do one coat tomorrow. We'll see.

Wednesday, September 18, 2013

Refinishing the desk: Part 3

Polished off the sanding tonight (that's almost a pun, right?), filled in a couple nicks and called it a night.


You'll notice I skipped the inside side panels of the drawer.


I started them, as you can tell from the picture. I started them and quickly decided it wasn't worth it. They'll only be visible when the drawer is open, and oh my god all those corners!  If I were to do it, it would take another 4 hours; I honestly do not have it in me.


I filled in a tiny hole on the top and a nick on the side using Elmer's Carpenter's Wood Filler. I didn't have a putty knife so I improvised with a plastic fork and my finger. It worked just as well and I'm no worse for wear. Let each spot dry 15 minutes, touched it up with some fine-grit sandpaper and considered throwing on a coat of primer.

I ultimately decided to save the primer for tomorrow. I had the time and the energy to throw on a coat of primer and close up shop for the night; however upon reading the directions, I realized I would need to leave the garage door open while it dries. Which is fine, just not at 10:00 PM. So, that's my plan for tomorrow. Layer of primer when I get home from work, pack for an hour, repeat. The directions say to use 2-3 coats,

Tuesday, September 17, 2013

After 8 hours of sanding...

...the sanding isn't quite done.


The body of the desk is almost done. The inside of the right leg isn't there yet, the finish there is more stubborn than it has been on any other piece. And, obviously, I haven't touched the drawer yet.

Please excuse the moving-mess in the background. 15 days!

Monday, September 16, 2013

Surprise Furniture Project!

I visited my mom yesterday, and brought home my desk ahead of our move. I've been told the work-at-home equipment from work is very temperamental, and the tech team only comes twice–to set it up when you start, and to tear it down when you leave. So I want my workspace set up before the come; this way the desk will be there right away when we move in.

We also discussed refinishing furniture, vis-a-vis a dresser she's giving us. We sanded the top a little bit just to see, and the varnish started coming off easily. That dresser will be coming up in a truck the weekend after we move in, and I'm planning to tackle that right away. Get it sanded and stained before taking it up the stairs, right?

Mom also sent me home with some borrowed and donated tools: steel wool, and hand-sander, and an electric belt sander. And an itch to refinish!


So I started with the desk? Wasn't really planning on it at first, but I have a plan that I'm excited about. I sanded a little corner last night before I remembered to take a picture:


And I've spent most of the day–6 hours so far–sanding. I've been re-watching Downtown Abby while I'm at it, which helps pass the time. Taking a break for the moment, and I'm hoping to finish up later tonight.

Thursday, September 12, 2013

Rio..

...de Janeiro? Not quite.


It's the Rio Dress knit for a family friend's newborn daughter. As a matter of fact, she was born earlier today, a healthy baby girl. 

I modified this slightly; I skipped the horizontal seed stitch band right about the skirt, and I shortened the length. I made the 6 mos size, I'm thinking this will hit at about her knees and I like it like that. 

Wednesday, September 11, 2013

Wash Cloths

I had two skeins of white and yellow variegated Lily & Cream laying around, and what better use for it than some wash cloths?


They knit up quickly! When I started knitting, I didn't understand why anyone would hand knit wash cloths only to rub them all over grimy, greasy dishes. Kind of like I didn't understand why anyone would knit socks if they are just going to be covered by shoes. Well, I get it now. The wash cloths at least. They are thicker than store-bought, and more absorbent, and are better at getting the grossness off.

Tuesday, September 10, 2013

Replacement Buttons

File this under "Wrapping up projects before the move." This dress lost its button a while ago:


But then it found a new one. I couldn't find the spare that originally came with it, so I had to find a replacement.

Because of the loop, it needed to be a shanked one, but I didn't feel strongly that it needed to be the same exact one. So when I found a white-ish semi-opaque one of the right size, I went for it.


And now it's hanging out in the closet again, where it belongs.

Monday, September 9, 2013

We're moving!

I am thrilled to announce that we are moving! My husband, Ben, got a teaching job in small community about an hour from where we currently live in Western Wisconsin. In service started in late-August, and he has been commuting ever since, but not for much longer!

In October, we will be moving into a townhouse in small, artsy community closer to Ben's work. I will work from home in my current position, in online customer service. The blog will continue as normal, with an exciting new component: home decorating!

This will be our first real place together--we've been living in a furnished apartment over my in-laws garage. Now we get to pull wedding presents out of storage, and go furniture shopping!

We're still in the planning phase, but here are some things we like:

From top left: Kivik love seat and chaise, IKEA, $879; Vine Snap Wall Decor, Target, $19.99; Teal Honeycomb Lamp, Pier 1 Imports, $55; Besta system, IKEA; Hemnes Day Bed, IKEA, $299; PoĂĄng in BomstermĂĄla Multicolor, IKEA, $99; Vejmon coffee table, $149, IKEA; Threshold Windham Accent Cabinet, Target, $120; Swirl Sculpture, Pier 1 Imports, $19.95. 

Friday, September 6, 2013

My First Quilt: Part 4

Once I was organized, it was smooth sailing–er, sewing. Progressing horizontally across the quilt, I sewed pairs of blocks together, and then sewed sets of double-blocks together and sew on (sorry, I couldn't resist). This part went pretty quickly. Once that was finished, I sewed the horizontal bars together and le voilĂ !


It's not completely done yet. It needs a border, and a backing, binding, and then it needs to be quilted; but it's been hanging out in this maybe-80%-finished state for a while.

These are the fabrics I had originally picked out for the border and the back.


I'm not quite loving them. They just don't quite seem to fit. And I haven't been a rush to find something else, either.

Thursday, September 5, 2013

My First Quilt: Part 3

When we left off, I had cut the fabric and drawn myself a map.

When I picked it up again, I realized many of my cuts were off and I had lost my map.

If the cuts were just crooked, I could have made it work. And many of them were, but there were a few that were waves. I'll post a picture as soon as I can find one, but I have no idea what happened. I couldn't repeat it if I tried.

I put on my blinders and kept sewing--despite all common sense--because I could sort it all out later and it would be fine. I was lying.

I had no map. I did not have all the blocks that I started with. I had no idea what I was going to do.

I ripped out most of the seams that had been sewn, and sorted and counted my blocks again. Then I started arranging them on the floor until it seemed to work again. I had to make two important sacrifices:


  1. The quilt would be whatever size it wanted to be. It definitely would not cover a queen size bed as intended, and probably wouldn't even cover a twin. It will hang out at the foot of the bed, I guess?
  2. Apparent randomness went out the window. The blocks would have to follow a certain sequence so that one block didn't touch any two of the same.

That is how we arrived at this picture:


I didn't just draw a map this time. Oh, no. I drew a map, and labelled it, and stapled a swatch of each fabric to the map. Then I took about six dozen pictures. You know, just in case I accidentally deleted 71 of them.

When I put the blocks away, I kept them arranged in their rows, paper clipping a scrap of paper with the row number written on it. The rows were then stacked chronologically--it would be smooth sailling from here on out.

Ten o'clock on a Friday night. Bo was almost as tired as I was. Almost.

Wednesday, September 4, 2013

My First Quilt: Part 2

When I started planning this quilt, I knew I couldn't sew a straight line to save my life. I wanted to keep it simple, I wanted to enjoy the process (ha!); which, in my mind, meant not ripping out and redoing every single seam until it was perfect.

I decided on an off-set brick pattern, in order to avoid an almost-four-corners situation. You know, when there's a little jog because (Oops!) Arizona is crooked. And wide seam allowances, so that when I got of course, I could allow for it and hide it.


I wanted the pattern to be somewhat random, but I did not want any one square to touch two squares of the same fabric.


I wanted this (above) as opposed to that (below)


Although based on my sketch, I'm liking the latter better.

Anyway, I cut my fabric (6" x 4" rectangles), drew myself a map and called it a night.

Tuesday, September 3, 2013

My First Quilt: Part 1

Back when I worked at a fabric and craft store, I loved helping customers choose fabrics for quilts. Loved it. Almost as much as I loved putting the fabric away. Okay, maybe the quilting thing is actually second the putting-things-away thing. I loved my job.

Somewhere along the line, I decided I needed to pick out some fabrics for myself.


Picking the fabric was the easy part.

Picking the fabric was the only easy part.


This was the first pick I took, roughly half-way through. At the time, the only thing preventing me from chucking the whole thing was my own pigheadedness. But more on that tomorrow!


Monday, September 2, 2013

Happy Labor Day!


Happy Labor Day!

(Yes, there are only 42 stars in my flag. Artistic liberties :) )